 GuestLens
Run your site
Google Drive storage
GuestLens can keep every photo, video, and voice note in a Google Drive. Each event gets its own
folder inside one GuestLens folder, so you can open your Drive and find the files.
It works with a free Google account and with Google Workspace.
1. Make a sign-in client in Google Cloud
This is free and takes about five minutes. You do it once.
- Open console.cloud.google.com and sign in with the Google account whose Drive you want to use. Make a new project, for example "GuestLens".
- Open APIs and services, then Library. Find Google Drive API and press Enable.
- Open OAuth consent screen (in newer screens, Google Auth Platform). Choose External, give the app your site name and your email, and save.
- Under Audience (or Publishing status), press Publish app so the status is In production. While the status is "Testing", Google ends the sign-in after 7 days, and uploads stop.
- Open Credentials (or Clients), press Create credentials, then OAuth client ID. Choose Web application.
- Under Authorized redirect URIs, paste the address shown on the GuestLens Storage screen. It looks like
https://your-site.com/admin/storage/google/callback. Press Create. - Google shows a client ID and a client secret. Keep this window open.
GuestLens asks only for the drive.file permission. It can see the files it made
itself, and nothing else in your Drive. Google does not ask you to verify the app for this
permission.
2. Connect the Drive
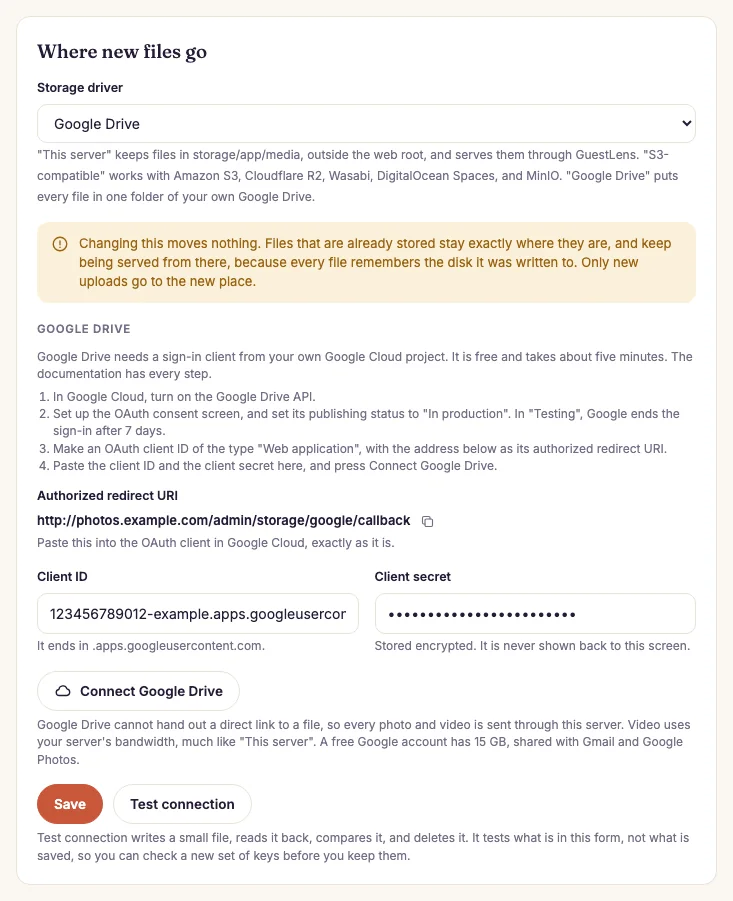
- Storage driver: choose Google Drive.
- Authorized redirect URI: copy it into the OAuth client in Google Cloud.
- Client ID and client secret from Google Cloud. The secret is stored encrypted.
- Connect Google Drive opens the Google sign-in.
- Save makes Google Drive the place for new uploads.
- Test connection checks that the Drive can be written to.
- In the GuestLens admin, open Storage and choose Google Drive.
- Paste the client ID and the client secret.
- Press Connect Google Drive. Google asks you to choose the account and allow access. Google may say the app is not verified: press Advanced, then go on to your site. This is your own app, so this is safe.
- Google sends you back to the Storage screen, which says Connected as your account. GuestLens has made the
GuestLensfolder in your Drive. - Press Test connection. It writes a small file, reads it back, deletes it, and shows how much of your Drive is used.
- Press Save. New uploads go to Google Drive from now on.
How the files are kept
Inside the GuestLens folder, the files use the same folders as on your server:
events/<event id>/<year>/<month>/ for photos, videos, and their
previews, and events/<event id>/guestbook/ for voice notes. Do not move or
rename files in the Drive. GuestLens remembers where each file is, and a moved file stops
showing. When a host deletes an event, its folder is deleted from the Drive too.
If something goes wrong
- "redirect_uri_mismatch" from Google: the redirect URI in Google Cloud is not exactly the one on the Storage screen. Copy it again, with
httpsand no space at the end. - "Google Drive no longer accepts the saved sign-in": the app is still in "Testing", or the access was removed in your Google account. Publish the app, then press Connect again.
- Uploads fail with "storage quota": the Drive is full. Free some space, or buy more space from Google.
- Disconnect works only after you choose another storage driver and save, so new uploads always have somewhere to go.